QDL INSTALLATION INSTRUCTIONS

- To install the suppressor, slide the coupling opening over the rifle’s cylindrical muzzle brake, making sure the tabs clear the slots and the lock ring is turned to the “UNLOCK” position.
- An indexing pin inside the suppressor locates in a notch on the rifle’s muzzle brake to ensure proper alignment.
- Turn the suppressor lock ring toward the “LOCK” position and engage the notches with the latch. Tighten the ring as far as it will rotate. NOTE: It is very important that this ring be tightly secured to keep the suppressor in place.
- To detach the suppressor, press the suppressor latch and turn the lock ring until notches are disengaged and latch is in the“UNLOCK” position. Slide the suppressor off the rifle’s muzzle brake.
To clean the suppressor, wipe the threaded portion of the lock ring with a gun cleaning solution and rag. Remove any loose sand or debris in the bore. The coupler interior and first baffle may be brushed out with a plastic or bronze brush to remove carbon. Wipe down the suppressor exterior with a dry cloth.
AUXILIARY MUZZLE BRAKE
The Barrett QDL Suppressor system comes with a detachable auxiliary muzzle brake. The suppressor functions with or without this brake, depending on your preference. The auxiliary brake will alleviate some recoil, but maximum sound and flash suppression is accomplished without the auxiliary brake.
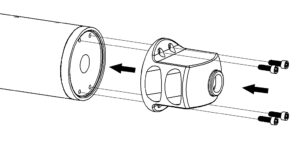
- To install the auxiliary muzzle brake, you will need a T-25 Torx Wrench.
- Clean the face of the suppressor and place the auxiliary muzzle brake on the front, aligning the bores.
- Install and torque the four (4) T-25 Torx Screws to 30 in./lbs. After firing the first ten (10) rounds through the suppressor, it is necessary to remove the suppressor from the rifle and re-torque the auxiliary brake attachment screws to 30 in./lbs. to ensure proper fit before further firing.
- Removal of the auxiliary brake is in reverse order.